FreeRTOS Windows Port
For Visual Studio or Eclipse and MingW
[RTOS Ports]
A Note For Users of FreeRTOS V9.0.0! The Win32 project in the
FreeRTOS V9.0.0 distribution uses Visual Studio 2015 Community Edition in place
of Visual Studio 2010 Express Edition. The project can still be
opened in Visual Studio 2010, but the compiler version referenced from the
project's options must be manually updated before the project can be built.
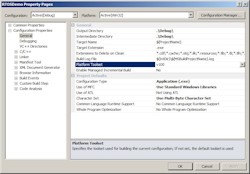
The compiler version is set using the "Platform Toolset" option highlighted in
the screen shot on the right. Click the screen shot to enlarge.
Preamble - for beginners
If you are new to FreeRTOS then it is recommended to start by viewing the
Getting Started With Simple FreeRTOS Projects
documentation (which also describes how to use the FreeRTOS Windows port),
before viewing this page.
Introduction
This page presents a Windows port layer for FreeRTOS that has been developed and
tested using both Visual Studio 2015 Community Edition
and the Eclipse IDE for C and C++ Developers
with the MingW GCC based compiler.
Demo projects are provided for both tool chains. Both tool chains are also free,
although Visual Studio must be registered if it is to be used for anything
other than evaluation purposes.
The port was developed on a dual core Intel processor running 32 bit Windows XP,
and is now maintained on a quad core Intel processor running 64-bit Windows 7
(although the project creates a 32-bit binary).
Notes on using the Windows FreeRTOS port
Please read all the following points before using this RTOS port.
- Principle of Operation
- Items to Note Before Using the Port
- Source Code Organisation
- Using the Eclipse / MingW (GCC) Demo
- The Demo Application
- Defining and Using Simulated Interrupt Service Routines
Principle of Operation
Threads that run tasks
The Windows port layer creates a low priority Windows thread for each FreeRTOS task created
by the FreeRTOS application. All the low priority Windows threads are then kept
in the suspended state, other than the Windows thread that is running the FreeRTOS
task selected by the FreeRTOS scheduler to be in the Running state. In this way, the FreeRTOS
scheduler chooses which low priority Windows thread to run in accordance with
its scheduling policy. All the other low priority windows threads cannot run because they are suspended.
FreeRTOS ports that run on microcontrollers have to perform complex context
switching to save and restore the microcontroller context (registers, etc.) as
tasks enter and leave the Running state. In contrast, the Windows simulator
layer simply has to suspend and resume Windows threads as the tasks they represent
enter and leave the Running state. The real context switching is left to Windows.
Simulating the tick interrupt
The tick interrupt generation is simulated by a high priority Windows thread that will
periodically pre-empt the low priority threads that are running tasks. The tick
rate achievable is limited by the Windows system clock, which in normal FreeRTOS
terms is slow and has a very low precision. It is therefore not possible to
obtain true real time behaviour.
Simulating interrupt processing
Simulated interrupt processing is performed by a second higher priority Windows
thread that, because of its priority, can also pre-empt the low priority threads
that are running FreeRTOS tasks. The thread that simulates interrupt processing
waits until it is informed by another thread in the system that there is an
interrupt pending. For example the thread that simulates the generation of tick
interrupts sets an interrupt pending bit, and then informs the Windows thread
that simulates interrupts being processed that an interrupt is pending. The simulated
interrupt processing thread will then execute and look at all the possible interrupt pending bits
- performing any simulated interrupt processing and clearing interrupt pending bits as necessary.
Items to Note Before Using the Simulator
Windows programming by embedded engineers
Before using the provided Windows projects, please be aware that I (the authour
of the Windows simulator) am an embedded programmer, am not a Windows programmer.
The implementation may be naive. Any feedback
provided on the current implementation by those more knowledgeable about Windows
programming would be gratefully received.
Deleting tasks on Windows
When a FreeRTOS task is deleted, the Windows port will terminate the thread that
was responsible for running the task. However, under Windows, terminating a
thread from another thread will not cause the
resources that were being used by the terminated thread to be returned to the system. This
means that at run time there is a limit to the number of times the FreeRTOS
vTaskDelete() API function can be called. The limit is very high (many thousands),
but does prevent the standard demo 'death'
tasks from executing indefinitely before the demo tasks start to
report errors.
Load on the CPU of the host Windows machine
The load on the CPU of the host Windows machine will be very high while a
FreeRTOS application is being run. Responsiveness should not be too
badly effected because only low priority threads are used, but the CPU core temperature
will rise and the CPU cooling fans will respond accordingly.
If you are in any way concerned about the ability of your
computer to cope with the high temperatures generated then I would suggest the
use of a utility that provides information on both the current CPU core temperature,
and how close the current temperature is to the maximum temperature rating of your
particular CPU. Personally I use the free
Core Temp
utility for this purpose.
Source Code Organisation
Eclipse and MingW (GCC)
The Eclipse project for the FreeRTOS simulator demo application
is located in the FreeRTOS/Demo/WIN32-MingW directory of the main
FreeRTOS download. This needs to be imported into the Eclipse workspace in order
to build the project.
Visual Studio
The Visual Studio solution for the FreeRTOS simulator demo application
is called WIN32.sln and is located in the FreeRTOS/Demo/WIN32-MSVN
directory of the main FreeRTOS download.
Using the Eclipse and MingW (GCC) Demo
Obtaining the compiler
The MingW compilation tools
are not included as part of the Eclipse distribution and must be downloaded
separately.
Importing the FreeRTOS simulator project into an Eclipse workspace
To import the FreeRTOS simulator project into Eclipse:
-
Start the Eclipse IDE, and go to the Eclipse Workbench.
-
Select 'Import' from the Eclipse 'File' menu. A dialogue box will
appear.
-
In the dialogue box, select 'General | Existing Projects Into Workspace'.
Another dialogue box will appear that allows you to navigate to and
select a root directory.
-
Select FreeRTOS/Demo/WIN32-MingW
as the directory - this will reveal a project called RTOSDemo, which is the project
that should be imported.
The Demo Application
Functionality
The constant mainCREATE_SIMPLE_BLINKY_DEMO_ONLY, which is #defined at the top of main.c, is used to switch between a simply Blinky style demo, and a more comprehensive test and demo application, as described in the next two sections.
Functionality when mainCREATE_SIMPLE_BLINKY_DEMO_ONLY is set to 1
If mainCREATE_SIMPLE_BLINKY_DEMO_ONLY is set to 1 then main() will call
main_blinky(), which is implemented in main_blinky.c.
main_blinky() creates a very simple demo that includes two tasks and one queue.
One task repeatedly sends the value 100 to the other task through the queue. The
receiving task prints out a message each time it receives the value on the queue.
Functionality when mainCREATE_SIMPLE_BLINKY_DEMO_ONLY is set to 0
If mainCREATE_SIMPLE_BLINKY_DEMO_ONLY is set to 0 then main() will call
main_full(), which is implemented in main_full.c.
The demo created by main_full() is very comprehensive. The tasks it creates
consist mainly of the standard demo tasks - which
don't perform any particular functionality other than testing the port
and demonstrating how the FreeRTOS API can be used.
The 'check' task created by main_full()
The full demo creates a 'check' task in addition to the standard demo tasks. This
only executes every (simulated) five seconds, but has the highest priority to
ensure it gets processing time. Its main function is to check that all the
standard demo tasks are still operational.
The check task maintains a status string that is output to the console each time
it executes. If all the standard demo tasks are running without error then the
string will print out "OK" and the current tick count. If an error has been detected
then the string will print out a message that indicates in which task the error
was reported.
Viewing the console output
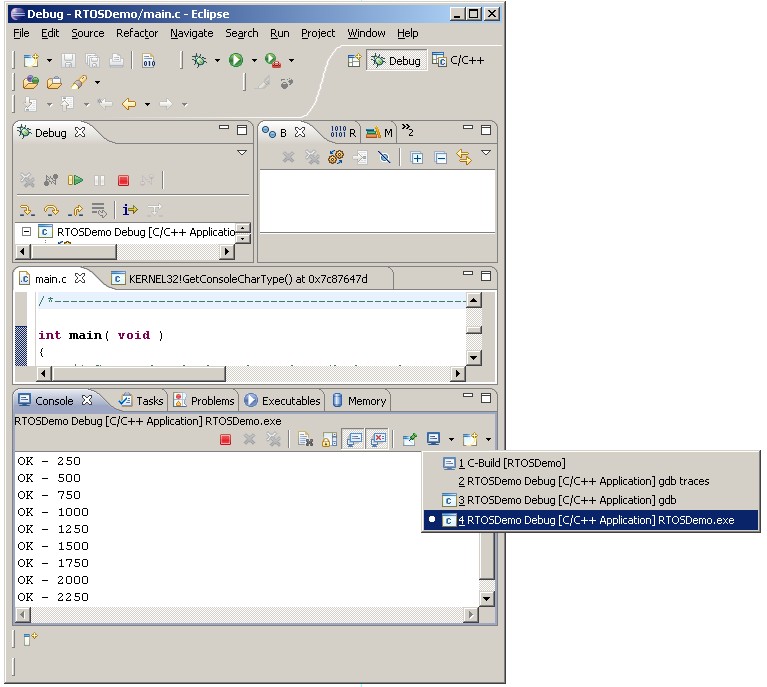
The eclipse project will output strings to an integrated console. To view these
strings the "RTOSDemo.exe" console must be selected using the drop down list
accessible from the little computer monitor icon speed button - as shown in the
image below.
The Visual Studio console output will appear in a command prompt window.
 Selecting the "RTOSDemo.exe" console during an Eclipse debug session
Defining and Using Simulated Interrupt Service Routines
Defining a handler for a simulated interrupt service routine
Interrupt service routines must have the following prototype:
unsigned long ulInterruptName( void );
where 'ulInterruptName' can be any appropriate function name.
If executing the routine should result in a context switch then the interrupt
function must return pdTRUE. Otherwise the interrupt function should return
pdFALSE.
Installing a handler for a simulated interrupt service routine
Handlers for simulated interrupt service routines can be installed using the
vPortSetInterruptHandler() function which is defined in the Win32
port layer. This has the prototype shown below:
void vPortSetInterruptHandler( unsigned long ulInterruptNumber, unsigned long (*pvHandler)( void ) );
ulInterruptNumber must be a value in the range 3 to 31 inclusive and be
unique within the application (meaning a total of 29 simulated interrupts
can be defined in any application). Numbers
0 to 2 inclusive are used by the simulator itself.
pvHandler should point to the handler function for the interrupt number
being installed.
Triggering a simulated interrupt service routine
Interrupts can be set pending and, if appropriate, executed by calling the
vPortGenerateSimulatedInterrupt() function, which is also defined as part
of the Win32 port layer. It has the prototype shown below:
void vPortGenerateSimulatedInterrupt( unsigned long ulInterruptNumber );
ulInterruptNumber is the number of the interrupt that is to be set pending, and
corresponds to the ulInterruptNumber parameter of vPortSetInterruptHandler().
An example of installing and triggering an interrupt
The simulator itself uses three interrupts, one for a task yield, one for the
simulated tick, and one for terminating a Windows thread that was executing a FreeRTOS
task that has since been deleted. As a simple example, shown below is the code
for the yield interrupt.
The interrupt function does nothing other than request a context switch, so
just returns pdTRUE. It is defined using the following code:
static unsigned long prvProcessYieldInterrupt( void )
{
    /* There is no processing to do here, this interrupt is just used to cause
    a context switch, so it simply returns pdTRUE. */
    return pdTRUE;
}
The simulated interrupt handler function is then installed using the following call,
where portINTERRUPT_YIELD is defined as 2:
vPortSetInterruptHandler( portINTERRUPT_YIELD, prvProcessYieldInterrupt );
This is the interrupt that should execute whenever taskYIELD()/portYIELD() is
called, so the Win32 port version of portYIELD() is defined as:
#define portYIELD() vPortGenerateSimulatedInterrupt( portINTERRUPT_YIELD )
Copyright (C) Amazon Web Services, Inc. or its affiliates. All rights reserved.
|


